One of the things I like about WordPress is that you can see what interesting search terms people have used to find your blog. Fascinating stuff (for a certain, geeky, definition of “fascinating”). Anyway, seems that Chromedeck comes up quite a lot and a couple of people are looking for ways to change the width of the columns. When I first talked about Chromedeck, I said that this was something it couldn’t do. Turns out I’m wrong.
If you’ve ever right-clicked on a page in Chrome, you may have spotted “Inspect Element” as one of the options. I do this a lot, especially when I’m trying to work out why the stylesheet I’ve spent so long writing isn’t working properly. Yesterday, I right-clicked on Chromedeck and discovered that it’s basically just a web page. And because it’s a web page, there’s a stylesheet determining how it looks.
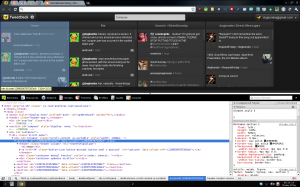
The screenshot below shows Chrome’s “Inspect Element” panel open with the right bit selected:
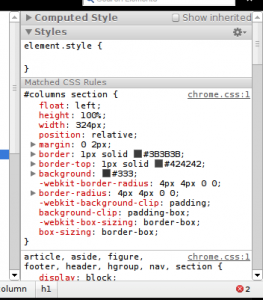
 Over in the right-hand pane of “Inspect Element” is a list of the various CSS rules affecting what’s being displayed:
 Looking at this, you can see that it’s the file “chrome.css” that’s affecting the column width, and that it’s currently set to 324px. If you jack this up to 500px (by clicking on the 324px in “Inspect Element” and typing in 500px), you get Chromedeck looking like this:
 The 2 extra columns I had have wrapped down and are off the bottom of the screen. Not ideal, but if you’ve only got a couple of columns you should be okay.
None of the changes made inside “Inspect Element” are permanent. The second you refresh the page, the original CSS file gets applied. So if you want to make these column width changes more permanent (at least until the next update of Chromedeck) you need to edit the original CSS.
First thing to find out is the directory name Chromedeck will be hiding under. Click on Chrome’s spanner icon, then “Tools”, then “Extensions” (or go to chrome://extensions/). Find Chromedeck in the list and keep that window open while you browse your computer.
On Linux, the path to the directory containing Chrome’s extensions is:
~/.config/google-chrome/Default/Extensions
I’ll add in the Windows path shortly.
The extensions directory contains a folder for each of your extensions but none of them have very sensible names. That’s where chrome://extensions comes in. Each extension has an ID, and that ID is the name of the directory in the extensions directory. Once you’ve got that, you’re almost there. Inside the ID directory is a version number directory, inside that the css directory and inside that is chrome.css. Finally!
The file chrome.css is a one-line monster. But from the “Inspect Element” panel we know we’re looking for “width:324px” and that only occurs once in the file. Find it, replace it with the column width of your choice, save it and refresh Chromedeck. You should see your changes.
And that’s that done until Chromedeck gets updated. You’ll know it’s been updated because you’ll be back to your default column widths, and you’ll have to go through all of this again to get your customisations back.
Of course, once you’ve made one change, it’s hard not to make more – you could change the font sizes, the background colours, really go to town on customisation. Who knows? Maybe Chromedeck will add in an option to use your own stylesheet in the future…

does anyone ever reply to the Monday Posts??
No, you’re the first!
*ahem geek* but cool! I gave up on Tweetdeck sadly, it’s Hootsuite for me these days. Hang on Chromedeck – is that Tweetdeck – or different? *mind implodes*
Chromedeck is Tweetdeck but running inside the Chrome browser rather than as a standalone application. I tried Hootsuite but didn’t like the adverts that appeared in my timeline. Yes, tweaking stuff like this is very geek. But is is also cool to be able to add your own tweak to these applications. Same tricks will work for any Chrome app!